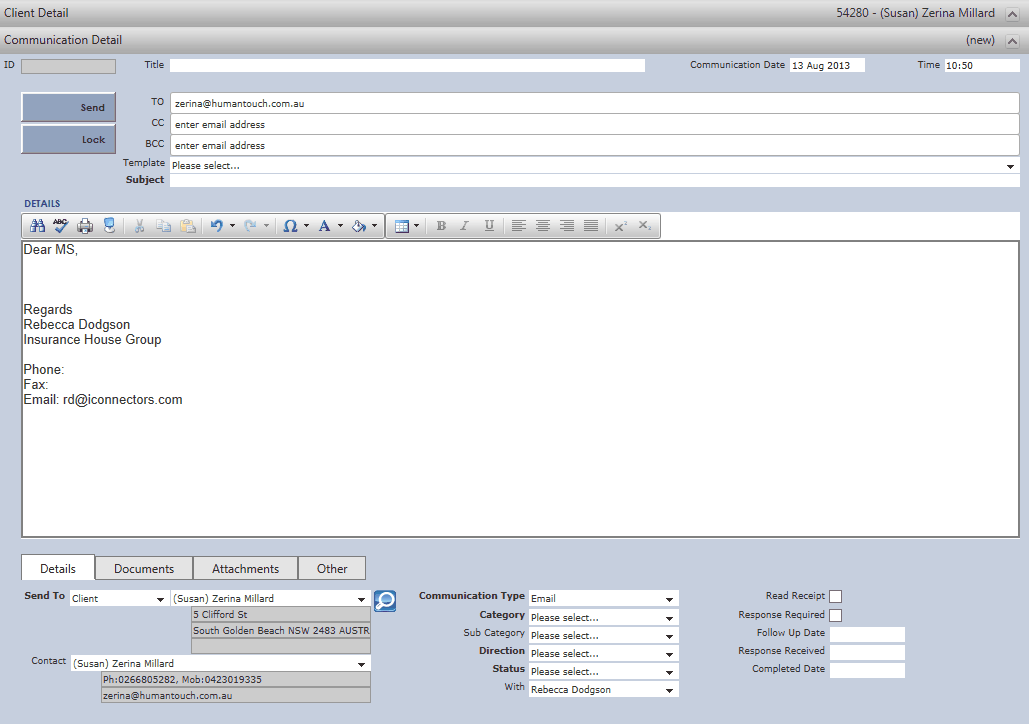
Click ![]() to open up the Communication Detail window.
to open up the Communication Detail window.

Complete the following;
•Communication ID: The UnderwriterCENTRAL™ system automatically allocates a Communication ID.
•Communication Type: Click ![]() and select preferred communication type.
and select preferred communication type.
•Category: Click ![]() and select preferred category type.
and select preferred category type.
•Sub Category: Click ![]() and select preferred category type.
and select preferred category type.
•Subject: Type in the subject of communication.
•Send To: Click ![]() and select preferred category for receiver.
and select preferred category for receiver.
•Contact: Click ![]() and select preferred person to receive communication.
and select preferred person to receive communication.
•Direction: Click ![]() and select preferred direction.
and select preferred direction.
•Status: Changing the Status to Sent or Queued (this occurs automatically when you send a fax or email) or Processing will lock the communication record so it cannot be changed.
•To: This field will automatically populate with fax and email details (if entered under client) for preferred person to receive communication as selected by Contact box. If need to change, click on box to amend/delete details.
•Communication Date: Click ![]() to confirm date of when communication sent.
to confirm date of when communication sent.
•Response Required: Tick ![]() if response required.
if response required.
•Follow Up Date: Click ![]() to add follow up date.
to add follow up date.
*Set a Task to remind yourself*
•Response Received: Click ![]() to document response to be received by date (this field will never lock)
to document response to be received by date (this field will never lock)
•Completed Date: Click ![]() to confirm date of when communication is to be completed by (this field will never lock)
to confirm date of when communication is to be completed by (this field will never lock)
•Details: Enter in body text of communication for sender to receive.
•Show All: Click ![]() to show all documents/attachments or other.
to show all documents/attachments or other.
•Documents: Click ![]() to select the Document(s) to add as an attachment to the communication.
to select the Document(s) to add as an attachment to the communication.
•Attachments: Click ![]() to select the Attachment(s) to add as an attachment to the communication. Please note that 'Documents' and 'Attachments' will show all that has been saved under the section, relevant to area of UnderwriterCENTRAL™ the user is currently in.
to select the Attachment(s) to add as an attachment to the communication. Please note that 'Documents' and 'Attachments' will show all that has been saved under the section, relevant to area of UnderwriterCENTRAL™ the user is currently in.
•Other: Click ![]() to select the Document(s) or Attachment(s) to add communication for sender to receive. Furthermore, other will show all other documents/attachments that have been added as Document History items.
to select the Document(s) or Attachment(s) to add communication for sender to receive. Furthermore, other will show all other documents/attachments that have been added as Document History items.
Click ![]() to Save all data.
to Save all data.