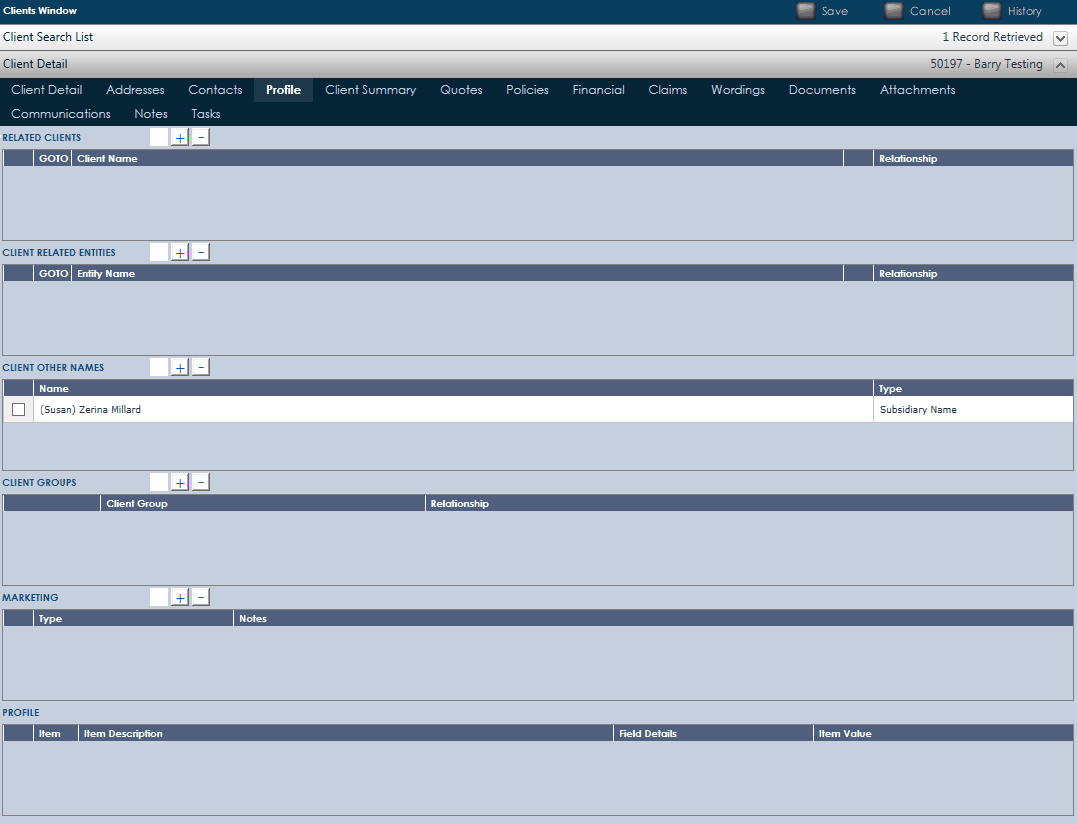
Click on the Profile tab ![]() to edit or view an existing profile. If there are already profiles relating to the client, a list will be presented.
to edit or view an existing profile. If there are already profiles relating to the client, a list will be presented.
In this area the user can add information to build a profile on your client. See Administration for instructions on setting up your Profile Items.

Once the user has set up this area in Administration, each Client's profile can then be set up.
Click in the Item Value field and type the response to the Item Description for that Client. If this changes over time, the user can delete and retype a response.
Related Clients – Only add detail here if there are other Related Clients in UnderwriterCENTRAL™.
| 1. | Click the |
| 2. | Click in the Relationship field and select a Relationship type from the list. |
3. To add more than one Related Client, click the ![]() again and repeat steps 1 and 2.
again and repeat steps 1 and 2.
4. To delete a Related Client, tick the box ![]() to the left of the Related Client and then click the minus
to the left of the Related Client and then click the minus ![]() to delete.
to delete.

Client Related Entities – Only add detail here if there are other Client Related Entities in UnderwriterCENTRAL™.
| 1. | Click on the plus |
| 2. | Click in the Relationship field and select a Relationship type from the list. |
3. To add more than one Client Related Entity, click the ![]() again and repeat steps 1 and 2.
again and repeat steps 1 and 2.
| 4. | To delete a Client Related Entity, tick the box |

Client Other Names – Only add detail here if your client is also known by another name/s.
1. Click ![]() and then click into the Name field. Type in the other name your client goes under.
and then click into the Name field. Type in the other name your client goes under.

| 2. | Then click the Type field and select from the drop down menu (see also Administration for setting up Type list). |

3. To add more than one Client Other Name, click the ![]() again and repeat steps 1 and 2.
again and repeat steps 1 and 2.
| 4. | To delete a Client Other Name, tick the box |
Client Groups – You can create groups of clients that exist in your database in this area
| 1. | Click |

2. Click in the Relationship field and select the best option from the drop-down list
3. To add more than one Client Group, click the ![]() again and repeat steps 1 and 2.
again and repeat steps 1 and 2.
| 4. | To delete a Client Group, tick the box |
Marketing – You can set up any types of Marketing Permissions you like for this area (see Administration for set up instructions).
| 1. | Click |

2. Click in the Notes field and type additional information here.
3. To add more than one Marketing Type, click ![]() and repeat steps 1 and 2.
and repeat steps 1 and 2.
| 4. | To delete a Marketing Type, tick the box |
Profile – In this area you can add information to build a profile on your Clients. You can collect information important to your businesses understanding of your Clients.
| 1. | Click in the Item Value field and type the response to the Item Description for that Client. If this changes over time, you can simply delete and retype your response. |

Click ![]() to Save all data.
to Save all data.